|
12345678910111213141516171819202122232425262728293031323334353637383940414243444546474849505152535455565758596061626364656667686970717273747576777879808182838485868788899091929394 |
- # tidyflow: a workflow that fits the tidyverse
-
- Tidyflow is *not* a package, but a project skeleton that you can clone/fork to start your own projects.
-
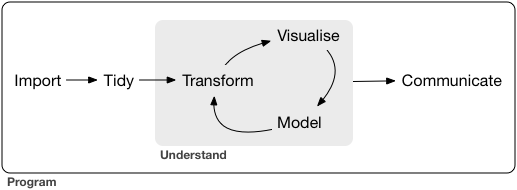
- It follows the project structure proposed by Hadley Wickham in [R for Data Science](http://r4ds.had.co.nz/)
-
- 
-
- ## Install
-
- `git clone https://www.github.com/maximewack/tidyflow new_project`
-
- to clone the project into a new directory.
- Don't forget to change the git remote origin to your own remote repo.
-
- The project already contains a *.gitignore* file for R projects.
-
- Also run `install.packages(c("tidyverse", "rmarkdown", "knitr"))` to install the necessary dependencies.
-
- ## Directory structure
-
- The project contains three subdirectories: **Data/**, **Docs/** and **Rmd/**.
- **Data/** also contains a **Raw/** subdirectory.
-
- **Data/Raw/** should contain the raw data when they exist as files (csv, xls(x), SQLite databases, SAS files, SPSS files, etc.).
-
- **Docs/** should contain all external documents you have about the project (synopsis, context articles/presentations, etc.)
-
- **Rmd/** will contain the files used to communicate the results.
-
- ## Scripts
-
- Four scripts are already present, populated with boilerplate code for each of the steps.
- Packages `dplyr`, `magrittr`, `tidyr`, and `purrr` can be useful all the way.
-
- **Every step makes a "savepoint" of your work, allowing you to rapidly iterate on any of the steps without having to re-run the previous ones (unless you've changed something up in the chain).**
-
- ### 01_Import.R
-
- The first script is used to import raw data (whatever the source) and save a local csv copy in **Data/**.
- Useful packages from the tidyverse here are `readr`, `readxl`, `rvest`, `haven`, and `jsonlite`.
-
- Having the data ready as simple csv is useful to always be able to start from the beginning, even if the original source is unavailable.
-
- ### 02_Tidy.R
-
- This step consists mostly of "non-destructive" data management: assign types to columns (factors with correct/human readable levels, dates, etc.), correct/censor obviously abnormal values and errors), transform between *long* and *wide* format, etc.
- Useful packages here are `lubridate`, `stringr`, and `forcats`.
-
- The results are saved in a **tidy.Rdata** file.
-
- After this second step, you will have your full data ready to use in R and shouldn't have to run the first two steps anymore (unless you get hold of new data).
-
- ### 03_Transform.R
-
- This script is for data transforming. It will contain all transformations of the data to make them ready for analyses.
- Some "destructive" data management can occur here, such as dropping variables or observations, or modifying the levels of some factors.
- Useful packages here are `forcats`, `lubridate`, and `stringr`.
-
- The results are saved in a **transformed.Rdata** file.
-
- ### 04_Analyze.R
-
- This script will contain more data transforming, and the analyses with production of the resulting tables and plots.
- There is a bit of an overlap between **03_Transform.R** and **04_Analyze.R** as it is often an iterative process. Both files can be merged into one, but it can be useful to have some time-consuming transformations in a separate script and have the results handy.
- Useful packages here are `broom`, `ggplot2`, and `modelr`.
-
- In this script *all* the "interesting results," full tables and ggplot graphs are included in a single hierarchical list, saved in a **results.Rdata** file.
- All the results from the analyses should be saved as-is without transformation, so that every result can be used in the Rmd.
- Having all the results pre-computed for the Rmd means that it will take mere seconds to re-compile, while still having access to all the results if you want/need to use them somewhere in the manuscript/report.
-
- The results object can look like this:
-
- ```
- results
- ├─ tables
- │ ├─ demographics
- │ ├─ ttt_vs_control
- │ └─ table3
- ├─ list_of_interesting_values
- ├─ interesting_values2
- └─ plots
- ├─ figure1
- ├─ figure2
- └─ figure3
- ```
-
- ### Rmd/report.Rmd
-
- The Rmd file should not contain *any* literal values: every number, table, graph *has* to come from the results object (in its original form).
- Only some really minor cosmetic modifications should be made then (running `prettyNum` on numerics or table columns, `select`/`filter`/`arrange`/`rename` on the full tables, etc.)
- Multiple Rmds can be made using the same results: one for a full blown scientific article, one for a quick report, one for a presentation, etc.
-
- You will never have to check again for discrepancies between tables/figures and text, or even between different media.
|
